5. Testing
Testing is an important part of package development but one that is often neglected due to the perceived additional workload. However, the reality is quite the opposite! Introducing formal, automated testing into your workflow can have several benefits:
Fewer bugs: you’re explicitly constructing and testing your code from the viewpoint of a developer and a user;
Better code structure: writing tests forces you to structure and compartmentalise your code so that it’s easier to test and understand;
Easier development: formal tests will help others (and your future self) add features to your code without breaking the tried-and-tested base functionality.
Chapter 3: How to package a Python, briefly introduced unit testing in Python package development. This chapter now describes in more detail how to implement formal and automated testing into a Python workflow. This chapter is inspired by the Testing chapter of the R packages book written by Jenny Bryan and the pytest package documentation.
5.1. Testing in Python
A unit test is a test written to verify that a chunk of code is working as expected. You probably already conduct informal unit tests of your code in your current workflow. In a typical workflow, we write code and then run it a few times in a Python session to see if it’s working as we expect. This is informal testing, sometimes called “manual testing” or “exploratory testing”. The whole idea behind automated testing is to define a formal, efficient and reproducible unit testing procedure to test your code.
There are a few testing frameworks available in Python. The two most common are:
The unittest framework is part of the standard Python library and has been around for a while so is still used by many open-source Python projects. However, we will be using pytest as our testing framework in this chapter. pytest is not part of the standard Python library but it is commonly used in the Python packaging community. It is fully-featured, simple and intuitive to use (especially for beginners), and is supported and extendable by a large ecosystem of plugins.
5.2. Testing workflow
The basic testing workflow comprises three key parts:
Create the test file and directory structure;
Write and run tests; and,
Determine test code coverage.
We’ll describe each step in a little more detail below, but be aware that the whole testing workflow is an iterative procedure. As you develop your code, add features, and find bugs, you’ll be writing additional tests, checking the code coverage, writing more tests, etc. In the rest of this chapter we’ll be revisiting and building on the toy Python package pypkgs you created in How to package a Python.
5.3. Test structure
pytest will run all files of the form test_*.py or *_test.py in the current directory and its subdirectories. Standard practice for Python packages is to place test modules in a test subdirectory within the root package directory. The MDS Cookiecutter template that we downloaded and used in How to package a Python to build our pypkgs package automatically created this directory structure for us:
pypkgs
├── CONDUCT.rst
├── CONTRIBUTING.rst
├── CONTRIBUTORS.rst
├── docs
│   └── ...
├── pypkgs
│   └── ...
├── .gitignore
├── LICENSE
├── pyproject.toml
├── .readthedocs.yml
├── README.md
└── tests
    ├── __init__.py
    └── test_pypkgs.py

Large libraries often split tests up into multiple test_*.py or *_test.py files within the tests directory to better organise tests. However, for many Python packages a single file will suffice, which by default is named test_yourpackagename.py. Recall that in How to package a Python we added the following test of our catbind() function in the file test_pypkgs.py:
from pypkgs import pypkgs
import pandas as pd


def test_catbind():
    a = pd.Categorical(["character", "hits", "your", "eyeballs"])
    b = pd.Categorical(["but", "integer", "where it", "counts"])
    assert ((pypkgs.catbind(a, b)).codes == [1, 4, 7, 3, 0, 5, 6, 2]).all()
    assert ((pypkgs.catbind(a, b)).categories == ["but", "character",
            "counts", "eyeballs", "hits", "integer", "where it", "your"]).all()
We can run that test by simply typing poetry run pytest at the command line.
Note
Recall that we have already installed pytest as a development dependency in our package. If you skipped this step previously, use the following command: poetry add --dev pytest.
We will continue to prefix our commands with poetry run to ensure we are using the software tools installed in our poetry virtual environment.
poetry run pytest

============================= test session starts ==============================
platform darwin -- Python 3.7.6, pytest-5.4.3, py-1.9.0, pluggy-0.13.1
rootdir: /Users/tbeuzen/GitHub/py-pkgs/pypkgs
collected 2 items

tests/test_pypkgs.py ..                                                  [100%]

============================== 2 passed in 0.72s ===============================
The output of pytest provides some basic system information, along with how many tests were run and what percentage passed. If a test fails, it will output the trace-back of the error, so you can see exactly what line of your test failed. That’s really all there is to the basics of automated testing! In the next section, we’ll discuss how to write tests using pytest in more detail.
5.4. Writing tests
5.4.1. The basics
We define tests for pytest to run in our test_pypkgs.py module as functions that are prefixed with test_. The test_catbind() function we defined above shows an example of this syntax. Within the test function, the test code will be written. There are three common types of tests you might want to use for evaluating your code, which are described below.
5.4.1.1. Asserting that a statement is True
The most common test you will write will be to compare the result of your code to a known result with the help of an assert statement. We’ve seen an example of this previously in our test_pypkgs.py module.
def test_catbind():
    a = pd.Categorical(["character", "hits", "your", "eyeballs"])
    b = pd.Categorical(["but", "integer", "where it", "counts"])
    assert ((pypkgs.catbind(a, b)).codes == [1, 4, 7, 3, 0, 5, 6, 2]).all()
    assert ((pypkgs.catbind(a, b)).categories == ["but", "character",
            "counts", "eyeballs", "hits", "integer", "where it", "your"]).all()
In the example, we are comparing the output of (pypkgs.catbind(a, b)).codes and (pypkgs.catbind(a, b)).categories to what we know should be the result/what we want the result to be. As you can see, in a pytest test function you may include one or more assert statements. If any of the included assert functions fail, the whole test will fail.
The assert statement can be used with any statement that evaluates to a boolean (True/False). You may also follow the assert statement with a string that will provide relevant information to the user if the assert fails. Try the following assert statements in a Python session to see which pass and which fail:
>>> x = 1
>>> assert (x > 0), 'x is not positive.'
>>> assert (x < 0), 'x is not negative.'
>>> assert (x == 1), 'x is not equal to 1.'
>>> assert (x != 1), 'x cannot be equal to 1.'
Hint
The first and third statements will pass and no message will be printed to the console. The second and last statements will fail and will print their messages to the console.
5.4.1.2. Assert that two numbers are approximately equal
Due to the limitations of floating-point arithmetic, numbers that we would expect to be equal are sometimes not:
>>> 0.1 + 0.2 == 0.3
False
As a result, when working with floating point numbers it is common to write tests that determine if numbers are approximately equal. For this we use the approx class from pytest.
>>> from pytest import approx
>>> 0.1 + 0.2 == approx(0.3)
True
You can use the abs and rel arguments to specify exactly how much absolute or relative error you want to allow in your test:
>>> 11 == approx(10, rel=0.1)
True
>>> 11 == approx(10, abs=0.1)
False
5.4.1.3. Assert that a certain exception is raised
You might have noticed that our catbind() function is not all that robust: it does not check the type of the inputs to ensure that they are Pandas categoricals. Therefore, if we passed in an input of a different data type the code would fail, throwing a generic error message:
>>> from pypkgs import pypkgs
>>> import pandas as pd
>>> a = pd.Categorical(["character", "hits", "your", "eyeballs"])
>>> b = ["but", "integer", "where it", "counts"]
>>> pypkgs.catbind(a, b)
Traceback (most recent call last):
  File "<stdin>", line 1, in <module>
  File "/Users/tbeuzen/pypkgs/pypkgs.py", line 31, in catbind
    pd.Series(b.astype("str"))])
AttributeError: 'list' object has no attribute 'astype'
Type checking can help ensure that your code is being used as intended, and if not, a useful error message can be raised to the user telling them how they should be using it. Let’s modify our catbind() function to include type-checking for Pandas categoricals. Below we’ve added two new lines of code directly under the (collapsed) docstring. This code checks that both the a and b inputs are Pandas categoricas, and if not, raises a TypeError with a useful message:
import pandas as pd


def catbind(a, b):
    """
    Concatenates two pandas categoricals.

    ...

    """
    if not all(isinstance(x, pd.Categorical) for x in (a, b)):
        raise TypeError("Inputs should be of type 'Pandas categorical'.")

    concatenated = pd.concat([pd.Series(a.astype("str")),
                              pd.Series(b.astype("str"))])
    return pd.Categorical(concatenated)
We’ve used TypeError here to indicate that the user has passed the wrong type of input into our function, but there are many other built-in exceptions for particular circumstances which you can read more about in the Python docs.
We can check that everything is working by re-trying our failed code from before:
>>> from pypkgs import pypkgs
>>> import pandas as pd
>>> a = pd.Categorical(["character", "hits", "your", "eyeballs"])
>>> b = ["but", "integer", "where it", "counts"]
>>> pypkgs.catbind(a, b)
Traceback (most recent call last):
  File "<stdin>", line 1, in <module>
  File "/Users/tbeuzen/pypkgs/pypkgs.py", line 31, in catbind
    raise TypeError("Inputs should be of type 'Pandas categorical'.")
TypeError: Inputs should be of type 'Pandas categorical'.
Great! Now we should formalise this unit test! The way we can check that our code will raise a particular exception for a given situation is using the raises statement of pytest. We’ll import raises at the top of our file and add a new test called test_input_type() demonstrating this:
from pypkgs import __version__
from pypkgs import pypkgs
import pandas as pd
from pytest import raises


def test_catbind():
    a = pd.Categorical(["character", "hits", "your", "eyeballs"])
    b = pd.Categorical(["but", "integer", "where it", "counts"])
    assert ((pypkgs.catbind(a, b)).codes == [1, 4, 7, 3, 0, 5, 6, 2]).all()
    assert ((pypkgs.catbind(a, b)).categories == ["but", "character",
                                                    "counts", "eyeballs", "hits", "integer", "where it", "your"]).all()

def test_input_type():
    a = pd.Categorical(["character", "hits", "your", "eyeballs"])
    c = ["but", "integer", "where it", "counts"]
    with raises(TypeError):
            pypkgs.catbind(a, c)
Our test_input_type() test is passing a wrong input type (a list in this case) to catbind() which we expect to raise a TypeError exception. If the exception is raised, our test will pass. Let’s check that everything is working as expected and our tests are passing by running pytest:
poetry run pytest

============================= test session starts ==============================
platform darwin -- Python 3.7.6, pytest-5.4.3, py-1.9.0, pluggy-0.13.1
rootdir: /Users/tbeuzen/GitHub/py-pkgs/pypkgs
collected 3 items

tests/test_pypkgs.py ...                                                 [100%]

============================== 3 passed in 0.30s ===============================
You can write as many tests as you like for your code. Ideally, your tests will cover all elements of your code. Later in this chapter we’ll show you how to determine how much of your code is being “covered” by your tests. But first, let’s look at some ways to better organise your tests.
Attention
In this section we added type checking functionality and tests for our ‘catbind` function. While type checking can be useful at times, the practice of duck typing, where data types are not checked, is more common in Python.
5.4.2. Classes, fixtures & parameterizations
You can populate your test module with as many individual test functions as you like, however as the number of tests grows its helpful to organise and streamline your tests. Classes, fixtures, and parameterizations in pytest are a few of the key things that can help here.
5.4.2.1. Classes
Classes are a way of grouping related tests together. Typically your code will consist of multiple functions, each of which needs to be tested with multiple tests. So its often useful to create a class that groups all the tests for each individual function together. You can define a test class in your test module by creating a class with a name prefixed with “Test”. You can then nest all relevant test functions within this class as is shown below:
from pypkgs import __version__
from pypkgs import pypkgs
import pandas as pd
from pytest import raises

class Testpypkgs:
    def test_version(self):
        assert __version__ == '0.1.0'

    def test_catbind(self):
        a = pd.Categorical(["character", "hits", "your", "eyeballs"])
        b = pd.Categorical(["but", "integer", "where it", "counts"])
        assert ((pypkgs.catbind(a, b)).codes == [1, 4, 7, 3, 0, 5, 6, 2]).all()
        assert ((pypkgs.catbind(a, b)).categories == ["but", "character", "counts", "eyeballs",
                                                        "hits", "integer", "where it", "your"]).all()

    def test_input_type(self):
        a = pd.Categorical(["character", "hits", "your", "eyeballs"])
        c = ["but", "integer", "where it", "counts"]
        with raises(TypeError):
            pypkgs.catbind(a, c)
While classes are a useful organisational tool, they have additional utility for handling fixtures and parameterizations which are discussed in the next section.
5.4.2.2. Fixtures
You may have noticed some repetition in our test code defining variables (a, b and c) to use in our tests. This violates the “DRY” principle and is where fixtures can come in handy. Fixtures are useful for sharing resources (functions or data) with test functions, and can be used by importing the fixture decorator from pytest. It is perhaps easiest to see a simple example utilising a fixture. Below we import the fixture decorator from pytest at the top of the module and then create a fixture called test_data() which in this case creates a dictionary of data that we would like to use with our test functions. This fixture can be passed to our test functions as an argument, meaning that we don’t have to repeatedly define our data in each test.
from pypkgs import __version__
from pypkgs import pypkgs
import pandas as pd
from pytest import raises, fixture

@fixture()
def test_data():
    return {'a': pd.Categorical(["character", "hits", "your", "eyeballs"]),
            'b': pd.Categorical(["but", "integer", "where it", "counts"]),
            'c': ["but", "integer", "where it", "counts"]}

class Testpypkgs:
    def test_version(self):
        assert __version__ == '0.1.0'

    def test_catbind(self, test_data):
        assert ((pypkgs.catbind(test_data['a'], test_data['b'])).codes ==
                [1, 4, 7, 3, 0, 5, 6, 2]).all()
        assert ((pypkgs.catbind(test_data['a'], test_data['b'])).categories ==
                ["but", "character", "counts", "eyeballs", "hits", "integer", "where it", "your"]).all()

    def test_input_type(self, test_data):
        with raises(TypeError):
            pypkgs.catbind(test_data['a'], test_data['c'])
You can read more about the utility of fixtures in the pytest docs.
5.4.2.3. Parameterizations
Parameteriziations can be useful for running a test multiple times using different inputs. This functionality is facilitated by the mark.parametrize decorator in pytest and is also best illustrated by example. Below we parameterize a test with two different scenarios. The first argument passed to @mark.parametrize is a string that defines the variables to be used in the test function (a, b, expected), and the second argument is a list of tuples, where each tuple contains the three elements (in order: a, b, expected) required to run the test. In our first test below we concatenate the categoricals ["big", "yellow"] and ["python"] and expect our function to return a categorical with categories ["big", "python", "yellow"]. In the second test, we concatenate the same two categoricals, but in the reverse order, and expect to get the same result.
from pypkgs import pypkgs
import pandas as pd
from pytest import raises, fixture, mark


@mark.parametrize("a,b,expected", [(pd.Categorical(["big", "yellow"]),
                                    pd.Categorical(["python"]),
                                    ["big", "python", "yellow"]),
                                   (pd.Categorical(["python"]),
                                    pd.Categorical(["big", "yellow"]),
                                    ["big", "python", "yellow"])])
def test_catbind(a, b, expected):
    assert (pypkgs.catbind(a, b).categories == expected).all()
If we ran this test module with poetry run pytest, the output would tell us that it ran two tests (it ran one test two times with different inputs). For most of the packages you’ll be creating, the methods discussed in this chapter will more than suffice your needs. However we’ve only scratched the surface of the pytest iceberg and it’s possible to combine classes, fixtures, parameterizations and much more to help build efficient, streamlined tests which can be useful for larger projects.
5.4.3. When to write your tests
Whether you should write your tests before you code, after you code, or somewhere in between is a topic of much debate and overall this choice may come down to personal preference, experience, resource availability, and code complexity. While there’s no “correct” testing workflow for everyone, we encourage you to have a go at Test-Driven-Development (TDD) - that is, writing your tests before you code. While this may seem a little counterintuitive at first, the TDD workflow can have many benefits:
you will better understand exactly what code you need to write;
you are forced to write tests upfront;
you won’t encounter large time-consuming bugs down the line; and,
it helps to keep your workflow manageable by focussing on small, incremental code improvements and additions.
Overall, TDD requires a larger upfront cost (of time and effort), but can help keep your workflow manageable and error-free and save you lots of time down the road. In our experience, errors found earlier are much easier to fix than errors found later, i.e., the age-old proverb, prevention is better than cure.
5.5. Code coverage
The tests you write should “cover” the majority of your code (100% is ideal but not always necessary). That is, your tests should run through most or all the lines of your code at least once. We refer to this as “code coverage” and there is a useful extension to pytest called pytest-cov which we can use to automatically determine how much coverage our tests have. Continuing with the pypkgs package that we have developed throughout this book, let’s add pytest-cov as a development dependency of our package:
poetry add --dev pytest-cov
We can then determine the coverage of our tests by running the following command which specifies the Python package directory (--cov=pypkgs) and where the tests are located (tests/):
poetry run pytest --cov=pypkgs tests/

============================= test session starts ==============================
platform darwin -- Python 3.7.6, pytest-5.4.3, py-1.9.0, pluggy-0.13.1
rootdir: /Users/tbeuzen/GitHub/py-pkgs/pypkgs
plugins: cov-2.10.0
collected 3 items

tests/test_pypkgs.py ...                                                 [100%]

---------- coverage: platform darwin, python 3.7.6-final-0 -----------
Name                 Stmts   Miss  Cover
----------------------------------------
pypkgs/__init__.py       1      0   100%
pypkgs/pypkgs.py         6      0   100%
----------------------------------------
TOTAL                    7      0   100%


============================== 3 passed in 0.33s ===============================
The output summarises the coverage of .py files in the pypkgs package directory (there are only two in this case, __init__.py and pypkgs.py). If you want to view your coverage in more detail to see exactly where code is/isn’t being covered you can save a full coverage report as described in the pytest docs. As an example, the below command prints the report to .html format (which by default is saved in a new directory in the root package directory called “htmlcov”):
poetry run pytest --cov-report html --cov=pypkgs tests/
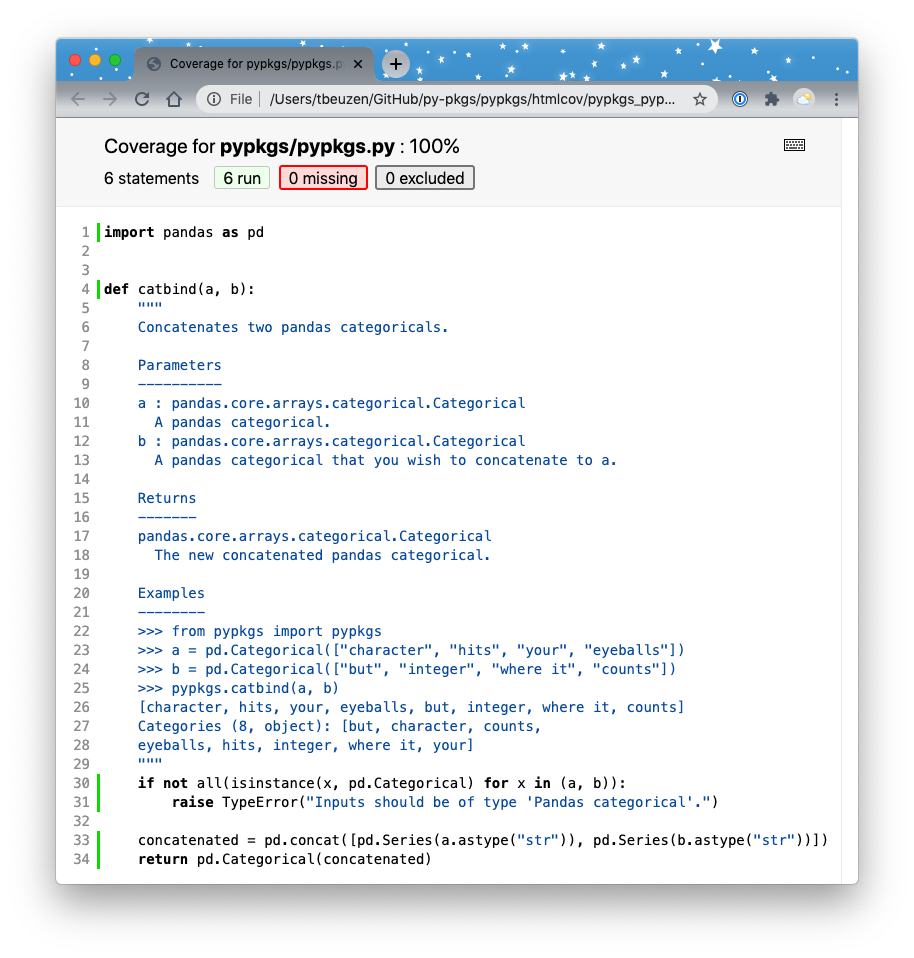
Fig. 5.1 The output html coverage report.