6. Documentation
Documentation is one of the most important aspects of a good package. For the users of your code (including your future self) it is necessary to have readable and accessible documentation expressing what your package does, how to install your package, and how to use the user-facing functions within it. Back in Chapter 3: How to package a Python we briefly introduced documentation in Python package development. This chapter now describes package documentation in more detail. This chapter is inspired by the Object documentation chapter of the R packages book.
6.1. Package documentation
You should have a few key pieces of documentation that describe your package/project as a whole, for example, how it can be used, licensing, who’s responsible for the package and guidance for how others can contribute to its development. Typically, these more “high-level” pieces of documentation are located in the package’s root directory and include:
README
License
Conduct (optional)
Contributors (optional)
Contributing (optional)
Each of these files are described in more detail below. Note that the Cookiecutter template we used previously in Chapter 3: How to package a Python automatically creates and populates these files for you.
6.1.1. README
The README file is perhaps the most important piece of documentation in your package and provides a general overview of your package. The README typically includes, in order:
The package name.
Any relevant badges (e.g., for continuous integration, test coverage, peer-review, hosted documentation, etc.). Here is a useful website for exploring badges.
A short description of the aims of the package.
Installation instructions.
Brief demonstration of usage.
Direction to more detailed documentation (more on this below).
Credits/citations.
6.1.2. License
All packages should include a license file. A license tells others what they can and can’t do with your code. You don’t have to include a license, however, if you choose not to, then default copyright laws may apply which means that you retain all rights to your source code and no one may reproduce, distribute, or create derivative works from your work - this is obviously not conducive to open-source work! The Open Source Initiative (OSI) is a good place to learn more about different licenses and GitHub also has a useful tool for helping you choose the most appropriate license for your package.
6.1.3. Conduct, contributors, contributing documentation
These files (and others) are optional inclusions to your project but help to define, protect and promote your work in the open-source world. Briefly, a conduct file is used to define community standards, identify a welcoming and inclusive project, and outline procedures for handling abuse. GitHub provides a good guide for adding a code of conduct to your project. A contributors file can be used to clearly identify project contributors (although you may choose to include this in your README file instead). A contributing file simply outlines procedures for how users can efficiently and helpfully contribute to your project. GitHub provides a good guide for adding a contributing file to your project.
6.2. Code documentation
Code documentation is the practice of adding human-readable descriptions to your code. Efficient and proper code documentation is important for helping others understand how your code works, why it works, for identifying bugs, and for extending code functionality. Code documentation can be split into two main categories:
comments: text within your code that is used to clarify what the code is doing and why.
docstrings: the first statement in a module, function, class, or method definition (preceding any code) that describes what the code does and may include defintions of arguments, example usage, and/or other important notes.
6.2.1. Comments
Commenting convention in Python is described in PEP 8 - Style Guide for Python Code. Your code comments will typically be inline or block comments.
6.2.1.1. Inline comments
Inline comments are placed on the same line as your code. They start with a # and should be preceded by at least two spaces. They should also start with a single space. Inline comments should not be unnecessarily verbose or just state the obvious, as this can be distracting and can actually make your code more difficult to read. We will continue to build upon the pypkgs package and catbind() function that has been developed throughout this book to illustrate commenting and docstrings in this chapter. An example of an inline comment is shown below.
def catbind(a, b):
    """
    Triple-quotes are reserved for defining docstrings which will be discussed in the next section.
    """
    if not all(isinstance(x, pd.Categorical) for x in (a, b)):  # check that both input arguments are pandas categoricals
        raise TypeError("Inputs should be of type 'Pandas categorical'.")

    concatenated = pd.concat([pd.Series(a.astype("str")),
                              pd.Series(b.astype("str"))])
    return pd.Categorical(concatenated)

6.2.1.2. Block comments
Block comments are paragraph-like text used to provide a more detailed description of your code. They typically precede the code they describe and should be used sparingly to avoid making your code overly verbose. Each line of a block comment should start with a # and a single space and should be indented to the same level as the code it precedes. A line containing a single # is used as a line break to split up multi-paragraph block comments. Triple-quotes should not be used for block comments - they are used for docstrings as described in the next section.
def catbind(a, b):
    """
    Triple-quotes are used for docstrings which are discussed in the next section.
    """
    if not all(isinstance(x, pd.Categorical) for x in (a, b)):  # check both inputs are categoricals
        raise TypeError("Inputs should be of type 'Pandas categorical'.")

    # Concatenating pandas categoricals can be tricky! The approach here is to coerce
    # categoricals to strings, then to Pandas series, so that they can be concatenated
    # with pd.concat(). We then re-cast the result to a pandas categorical.
    concatenated = pd.concat([pd.Series(a.astype("str")),
                              pd.Series(b.astype("str"))])
    return pd.Categorical(concatenated)
6.2.2. Docstrings
General docstring convention in Python is described in PEP 257 - Docstring Conventions. Docstrings are documentation included as the first statement in a module, function, class, or method in Python. Docstrings in Python are surrounded by triple-quotes, but other than that, there is flexibility in how you write your docstring. There are many different docstring style conventions used in Python. The exact style you use is important for helping you to render your documentation locally and remotely (more on that in the next section). The main styles currently in use are restructured text/sphinx style, google style, and NumPy style. Examples of each of these styles can be found here. Presently, we recommend the use of NumPy style documentation strings due to their readability and prevalance in many open-source Python projects.
NumPy style docstrings are described in detail in the numpydoc docstring guide. From that link, you will see that there is a wide range of information that you can include in your docstring, but the majority of docstrings you write will comprise only the following sections:
A one-line summary that does not use variable names or the function name;
An extended description/summary;
Parameter definitions and descriptions;
Returned value defintions and descriptions; and,
Example usage.
An example of the NumPy docstring style is shown below. Note that there is specific syntax and spacing for defining each element of your documentation - although most of the time, you will simply be copy-pasting docstring templates and won’t need to worry about remembering every detail. Each of the elements in the above numbered list is denoted by parentheses, e.g., (1), in the docstring below to help you identify the different parts of the docstring - these numbers are only for demonstration purposes and are not part of a standard docstring.
import pandas as pd


def catbind(a, b):
    """Concatenates two pandas categoricals. (1)

    Concatenates categorical `b` to categorical `a` and returns
    the resultant categorical. (2)

    Parameters (3)
    ----------
    a : pandas.core.arrays.categorical.Categorical
      A pandas categorical.
    b : pandas.core.arrays.categorical.Categorical
      A pandas categorical that you wish to concatenate to a.

    Returns (4)
    -------
    pandas.core.arrays.categorical.Categorical
      The new concatenated pandas categorical.

    Examples (5)
    --------
    >>> from pypkgs import pypkgs
    >>> a = pd.Categorical(["character", "hits", "your", "eyeballs"])
    >>> b = pd.Categorical(["but", "integer", "where it", "counts"])
    >>> pypkgs.catbind(a, b)
    [character, hits, your, eyeballs, but, integer, where it, counts]
    Categories (8, object): [but, character, counts,
    eyeballs, hits, integer, where it, your]
    """
    if not all(isinstance(x, pd.Categorical) for x in (a, b)):  # check both inputs are categoricals
        raise TypeError("Inputs should be of type 'Pandas categorical'.")

    # Concatenating pandas categoricals can be tricky! The approach here is to coerce
    # categoricals to strings, then to Pandas series, so that they can be concatenated
    # with pd.concat(). We then re-cast the result to a pandas categorical.
    concatenated = pd.concat([pd.Series(a.astype("str")),
                              pd.Series(b.astype("str"))])
    return pd.Categorical(concatenated)
6.3. Rendering your documentation
6.3.1. Rendering locally
Now that you’ve gone to the effort of documenting your package and code, the next step is to combine all of this documentation into a clean, readable “document”. This is important to help users explore and understand the functionality of your package without having to search through the source code or package directory structure. Sphinx is the main documentation generator used by the Python community (but note that it also works with, e.g., R, Java, PHP). Sphinx is based on reStructuredText, a lightweight markup language that works similar to Markdown but with different syntax. Many of the files we’ll use in this section to build our documentation are in .rst format. While we won’t focus on teaching the reStructuredText syntax here, if you open up one of these files, you’ll find that editing them is quite intuitive - if you wish to learn more about reStructuredText, we point you to the Sphinx documentation which provides a comprehensive guide to reStructuredText syntax.
For help installing Sphinx, you can read the Sphinx documentation but for the purpose of this section we will assume you are using poetry to help build your package. To add sphinx as a development dependency of your package we can run the following:
poetry add --dev sphinx
Note
The –dev argument is used to specify a development dependency, i.e., a package that is not required by a user to use your package, but is required for development purposes.
Your documentation typically lives in a subdirectory called docs in the root package directory. At a minimum this docs subdirectory typically includes a conf.py file (which configures how Sphinx reads and builds your documentation), an index.rst file (a master document which will serve as the “welcome page” of your documentation and typically includes a “table of contents” linking to the various parts of your documentation), and a Makefile and make.bat file which help Sphinx to build your documentation. Other than these files, you can include as many additional files into your docs subdirectory as you like. The MDS Cookiecutter template that we downloaded and used in How to package a Python automatically created the docs subdirectory for you, and populated it with a number of files to help you quickly build your documentation. Feel free to open these files up to have a look at what’s inside!
└── docs
     └── conduct.rst
     └── conf.py
     └── contributing.rst
     └── contributors.rst
     └── index.rst
     └── installation.rst
     └── make.bat
     └── Makefile
     └── usage.rst
If you don’t want to use the MDS Cookiecutter to build a directory structure, you can see the Sphinx documentation for help getting started building documentation from scratch.
We can build our documentation locally using the command:
cd docs
poetry run make html
Tip
We are building html renders of our documentation here, which is what you will usually want. However other formats are available too, such as pdf. See the Sphinx documentation for more.
This builds our base documentation which will be located in a newly created subdirectory called _build within the docs directory. If you open up _build/html/index.html you should see the following:
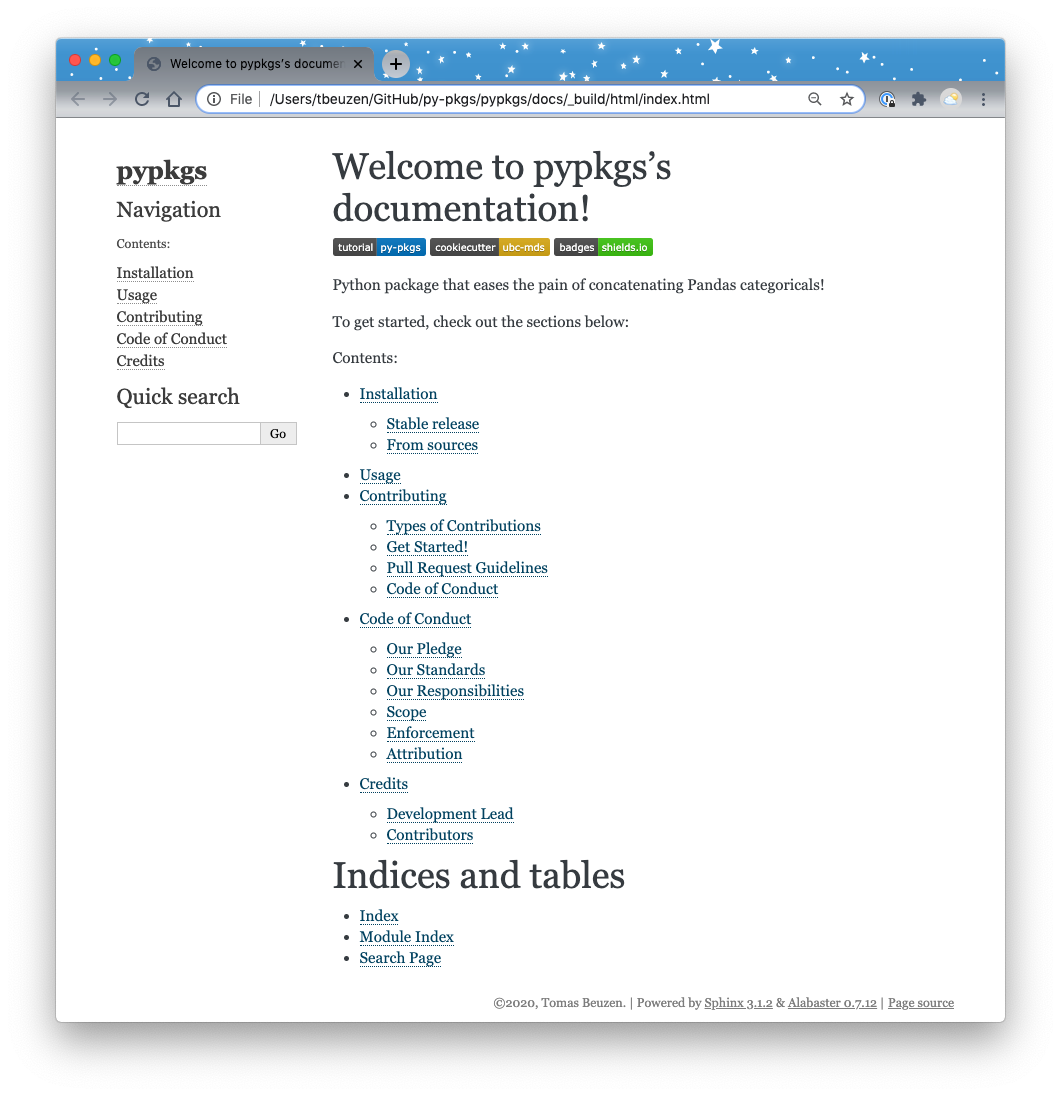
Fig. 6.1 The rendered docs homepage.
This cookiecutter provides you with most of the base documentation you’ll want for your package but you can modify it as much as you like. While it is possible to include files in your documentation that are not .rst format (such as .md files) with Sphinx - things start to get a little bit hacky and we recommend sticking with the workflow described above. If you want to include files such as images in your documentation, a common approach is to create a subdirectory called _static in the docs directory within which your files are placed and referenced to.
We’re not quite done yet. We still need to extract all the docstrings from our code and include them in our documentation so that they are easily accessible for users. In the index.html page above, if you click on the Module Index link under the heading “Indices and tables” at the bottom of the page you will get a “Your file was not found” message. This is because we need to render our docstrings into our documentation. To do this we can use the Sphinx extension napolean to render our NumPy style docstrings into our documentation. To add napoleon as a dependency to our development environment we can use the following command:
poetry add --dev sphinxcontrib-napoleon
Note
To use the extensions, we need to add extensions = ['sphinx.ext.napoleon', 'sphinx.ext.autodoc'] in the conf.py file in the docs directory, but we have taken care of this for you with our Cookiecutter template.
Now we can change back to the root pypkgs directory and use sphinx-apidoc to render our docstrings into our documentation (the renders will appear in docs/source/), and then make html to re-render our docs:
cd ..
poetry run sphinx-apidoc -f -o docs/source pypkgs
cd docs
poetry run make html
Now if you navigate back to the index.html page above and click on the Module Index link under the heading “Indices and tables” at the bottom of the page, you should see the following:
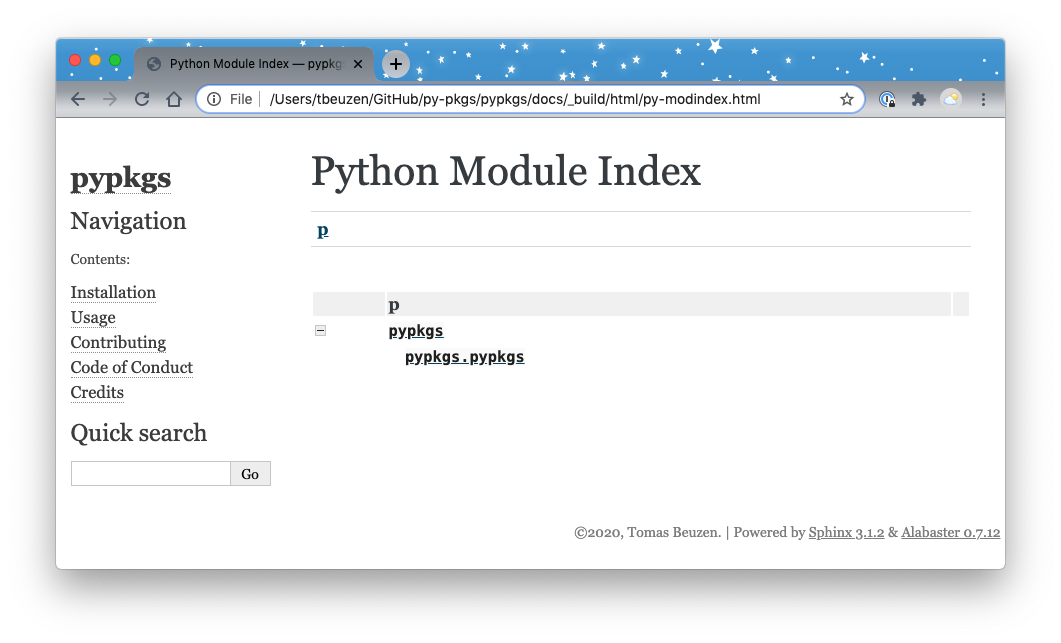
Fig. 6.2 The rendered docs module index.
We can click on the pypkgs.pypkgs module (which contains our catbind() function) to have a look at our rendered docstring which should look like the following:

Fig. 6.3 Our rendered module documentation!
We’ve now successfully created an html render of our documentation locally. You could of course send this documentation around locally, but it would be much more efficient to upload this documentation to an easily accessible remote location linked to your package. At this point you should push your rendered documentation to GitHub. In the next section, we’ll explore how we can then take this documentation and host it remotely.
6.3.2. Rendering remotely
Read the Docs is the most commonly used resource for hosting package documentation online. Assuming you have rendered your documentation locally and pushed it to your package’s remote GitHub repository you can do the following to host it on Read the Docs:
Visit https://readthedocs.org/ and click on “Sign up”;
Select “Sign up with GitHub”;
Click “Import a Project”;
Click “Import Manually”;
Fill in the project details by providing a package name (this must be a unique name), the repository URL, and leave the rest as is. Click “Next”; and,
Click “Build version”.
After following the steps above, your docs should get successfully built on Read the Docs and you should be able to access them via the “View Docs” button on the build page, or from the link that Cookiecutter created for your on your repositories README.md file. You might want to include the “docs | passing” badge now shown on your Read the Docs documentation page in your GitHub
Warning
For Read the Docs to work with the poetry package workflow you need to have a .readthedocs.yml in the root of your Python package. We have created this for you using Cookiecutter and you can view it here.