3. How to package a Python
To start this book, we will first develop an entire Python package from beginning to end. The aim of this chapter is to give the reader a simple and high level overview of the key steps involved in developing a Python package and what the final product we’re building actually looks like. Later chapters will then explore each of these key steps in more detail. This chapter was inspired by The Whole Game chapter of the R packages book written by Hadley Wickham and Jenny Bryan.
3.1. Package structure
The first thing to do is create a directory structure for our Python package. Without getting too technical, a Python package is just a structured of one or more modules. So that we don’t have to create this structure from scratch, we will use Cookiecutter & Poetry to do this for us (both of which you installed back in System setup).
Cookiecutter is a tool for populating a file and directory structure from a pre-made template. We have developed our own Cookiecutter template which is based off the template by the PyOpenSci organization for creating Python packages (PyOpenSci is a not-for-profit organization that promotes open and reproducible research through peer-review of scientific Python packages). To use our Cookiecutter template to set up the structure of your Python package, open up a terminal session, change into the directory where you want your package to live and run the line of code below:
cookiecutter https://github.com/UBC-MDS/cookiecutter-ubc-mds.git

You will be prompted to provide information that will help customize the project.
Note
In this tutorial we will be calling our package pypkgs. However, we will eventually be publishing our package to Python’s main package index PyPI. Package names on PyPI must be unique. As a result, you will need to choose a unique name for your package while following this tutorial. Something like pypkgs_[your intials] might be appropriate (e.g., pypkgs_TB). You should always check if your chosen name is already taken by visiting PyPI and searching for that name.
Below is an example of how to respond to the Cookiecutter prompts (default values for each attribute are shown in square brackets, hitting enter will accept the default attribute value):
full_name [Monty Python]: Tomas Beuzen
github_username [mpython]: TomasBeuzen
project_name [My Python package]: pypkgs
project_slug [pypkgs]:
project_short_description [This cookiecutter creates a boilerplate for a Python project.]: Python package that eases the pain of concatenating Pandas categoricals!
version ['0.1.0']:
Select open_source_license:
1 - MIT license
2 - BSD license
3 - ISC license
4 - Apache Software License 2.0
5 - GNU General Public License v3
Choose from 1, 2, 3, 4, 5 [1]:
Select include_github_actions:
1 - no
2 - build
3 - build+deploy
Choose from 1, 2, 3 [1]:
Attention
In the example above we chose not to include any GitHub Actions workflows in our initial directory structure. GitHub Actions workflows can help automate the building, testing and deployment of your Python package, workflows typically called Continuous Integration (CI) and Continuous Deployment (CD). We’ll explore these topics in more detail in a later chapter.
We now have a new directory called pypkgs (of course, your package will have a different name but for the rest of the book, we’ll keep referring to it as pypkgs). Next, we need to navigate into the pypkgs directory and initialize the project as a Poetry project so that we can take advantage of the package management and building tools of Poetry:
cd pypkgs
poetry init
Again we are prompted for more information related to our package. Once again, default values are shown in square brackets and have been populated where possible from the Cookiecutter template. Here is an example of how to respond to the prompts:
This command will guide you through creating your pyproject.toml config.

Package name [pypkgs]:
Version [0.1.0]:
Description []:  Python package that eases the pain of concatenating Pandas categoricals!
Author [Tomas Beuzen <tomas.beuzen@gmail.com>, n to skip]:
License []:  MIT
Compatible Python versions [^3.7]:

Would you like to define your main dependencies interactively? (yes/no) [yes] no
Would you like to define your development dependencies interactively? (yes/no) [yes] no
Generated file

[tool.poetry]
name = "pypkgs"
version = "0.1.0"
description = "Python package that eases the pain of concatenating Pandas categoricals!"
authors = ["Tomas Beuzen <tomas.beuzen@gmail.com>"]
license = "MIT"

[tool.poetry.dependencies]
python = "^3.7"

[tool.poetry.dev-dependencies]

[build-system]
requires = ["poetry>=0.12"]
build-backend = "poetry.masonry.api"


Do you confirm generation? (yes/no) [yes]
Note
We said “no” to defining our dependencies interactively because it is more efficient to define them using poetry add which we will explore a bit later on.
After using Cookiecutter and Poetry, we end up with the following directory structure:
pypkgs
├── CONDUCT.rst
├── CONTRIBUTING.rst
├── CONTRIBUTORS.rst
├── docs
│   ├── conduct.rst
│   ├── conf.py
│   ├── contributing.rst
│   ├── contributors.rst
│   ├── index.rst
│   ├── installation.rst
│   ├── make.bat
│   ├── Makefile
│   └── usage.rst
├── pypkgs
│   ├── __init__.py
│   └── pypkgs.py
├── .gitignore
├── LICENSE
├── pyproject.toml
├── .readthedocs.yml
├── README.md
└── tests
    ├── __init__.py
    └── test_pypkgs.py
These two simple steps (Cookiecutter + Poetry) have given us a boilerplate file and directory structure suitable for building our Python package. While there are quite a few files in our boilerplate, at this point we only need to worry about a few of these to get a working package together. Specifically, we’ll be working on:
the file where we will write the Python functions that our package will distribute (
pypkgs/pypkgs.py);the file where we will write tests to ensure that our package’s functions work as we expect (
tests/test_pypkgs.py); and,the
pyproject.tomlfile that defines our project’s metadata and dependencies and how it will eventually be built and distributed.
Later chapters will focus on the other components of the boilerplate, which can be used to refine your package and packaging process with, for example, quality documentation, extensive testing, continuous integration, version bumping, continuous deployment, etc.
Tip
Users of the RStudio IDE may also want to make this Python project directory an RStudio project. Why? Well, once you have an *.Rproj file, you can use that file to quickly open the RStudio IDE (which has a terminal and an interactive Python REPL, assuming you have set this up with reticulate) to the project’s root directory.
3.2. Putting your project under version control
Before we start developing our package it is generally good practice to put your data science projects under local and remote version control. The tools we recommend using for this are Git & GitHub. For this book, we assume readers have Git installed on their machine, have novice Git skills, and have a GitHub.com account.
3.2.1. Set up local version control
From the terminal and in the root pypkgs directory, we will initialize the repository to be tracked by Git using:
git init

Initialized empty Git repository in /Users/tbeuzen/GitHub/py-pkgs/pypkgs/.git/
Next, we need to tell Git which files to track (which will be all of them at this point) and commit these changes locally:
git add .
git commit -m "initial package setup"
[master (root-commit) 8b4edcb] initial package setup
 21 files changed, 704 insertions(+)
 create mode 100644 .gitignore
 create mode 100644 .readthedocs.yml
 create mode 100755 CONDUCT.rst
 ...
 create mode 100644 pyproject.toml
 create mode 100644 tests/__init__.py
 create mode 100644 tests/test_pypkgs.py
3.2.2. Set up remote version control
Now that we have set up our local version control, let’s create a repository on GitHub.com and set that as the remote version control home for this project:
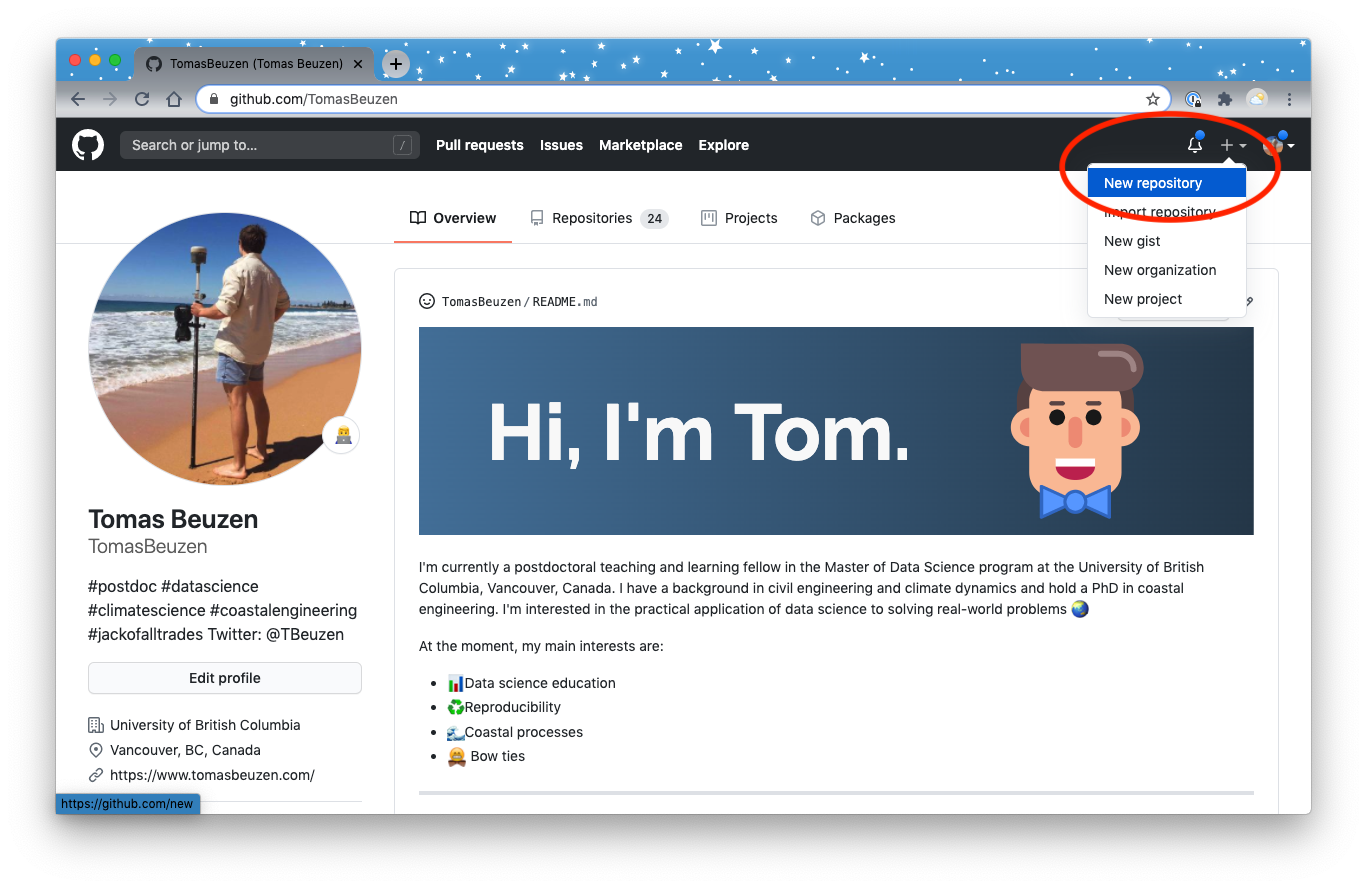
Fig. 3.1 Creating a new repository in GitHub.
The options we recommend for setting up a repository for a Python package using the workflow we present in this book include:
give the GitHub.com repository the same name as your Python Poetry project’s name;
make the GitHub.com repository public; and,
do not initialize the GitHub.com repository with a README file.
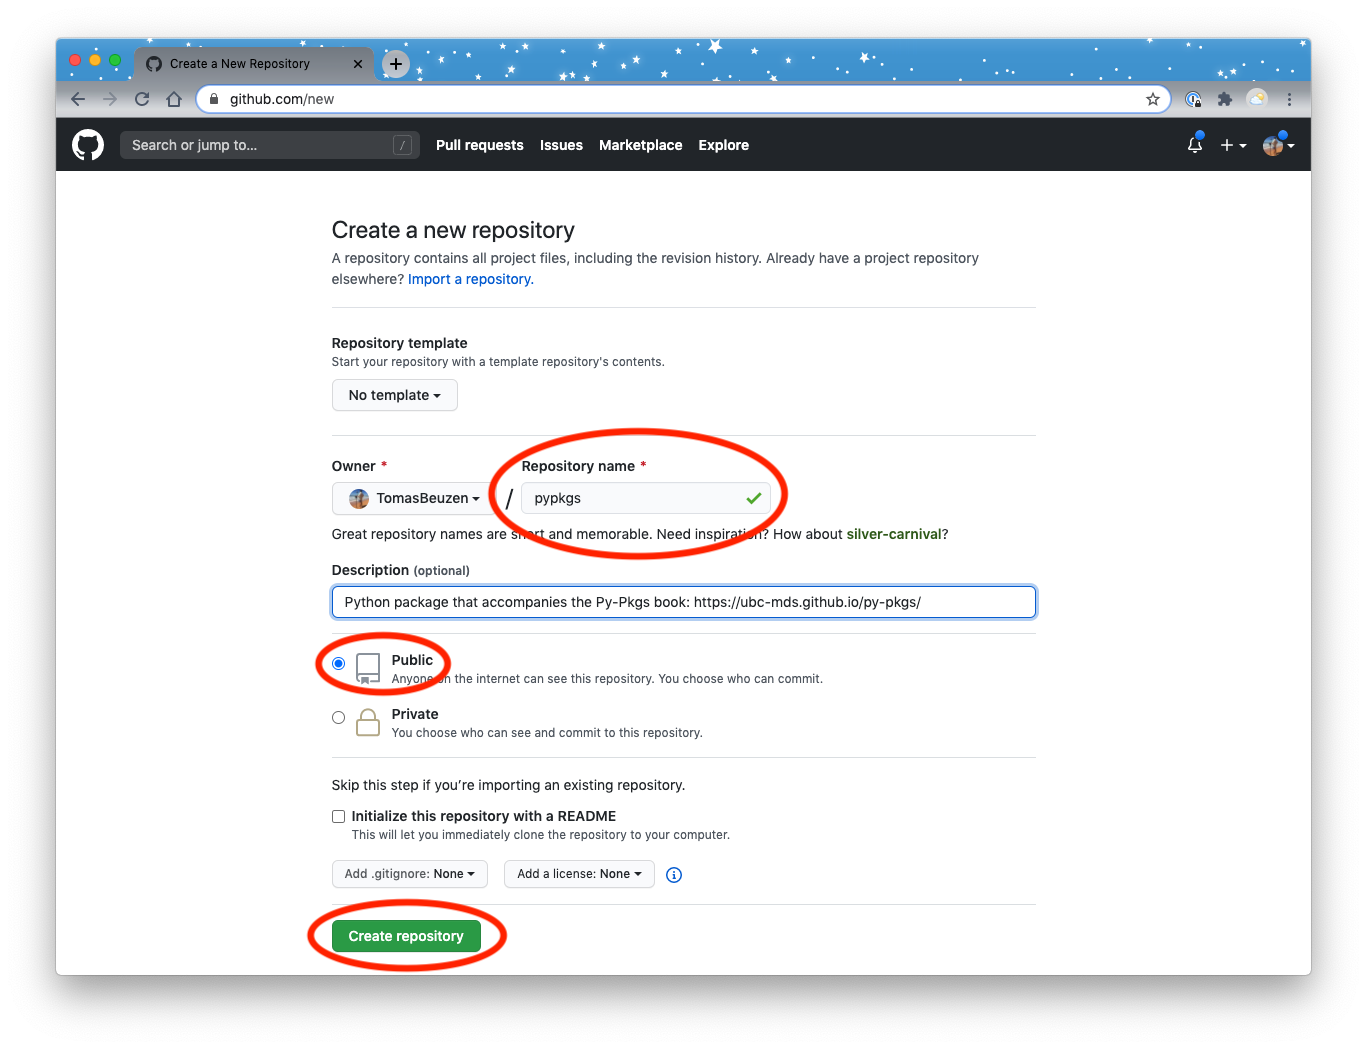
Fig. 3.2 Setting up a new repository in GitHub.
Next, copy the remote link to your repository and use the following commands to set the remote address locally, and push your project to GitHub.com:
git remote add origin git@github.com:TomasBeuzen/pypkgs.git
git push -u origin master
Enumerating objects: 25, done.
Counting objects: 100% (25/25), done.
Delta compression using up to 8 threads
Compressing objects: 100% (20/20), done.
Writing objects: 100% (25/25), 10.17 KiB | 2.03 MiB/s, done.
Total 25 (delta 0), reused 0 (delta 0)
To github.com:TomasBeuzen/pypkgs.git
 * [new branch]      master -> master
Branch 'master' set up to track remote branch 'master' from 'origin'.
Note
The example above uses SSH authentication with GitHub. SSH is useful for connecting to GitHub without having to supply your username and password every time. If you’re interested in setting up SSH, take a look at the GitHub documentation. If you don’t have SSH authentication set up, HTTPS authentication works as well and would require the use of this url in place of the one shown above to set the remote: https://github.com/TomasBeuzen/pypkgs.git.
3.3. Writing your first function
Pandas categoricals are a very useful data type for modeling (and were inspired by “factors” in R), but certain manipulations of this data type can be tricky during data wrangling. One such manipulation is the concatenation (joining) of two Pandas categoricals. Let’s observe the result of trying to concatenate two Pandas categorical objects:
import pandas as pd
a = pd.Categorical(["character", "hits", "your", "eyeballs"])
b = pd.Categorical(["but", "integer", "where it", "counts"])
pd.concat([a, b])
---------------------------------------------------------------------------
TypeError                                 Traceback (most recent call last)
<ipython-input-1-1af7dac6ee60> in <module>
      2 a = pd.Categorical(["character", "hits", "your", "eyeballs"])
      3 b = pd.Categorical(["but", "integer", "where it", "counts"])
----> 4 pd.concat([a, b])

~/python3.7/lib/python3.7/site-packages/pandas/core/reshape/concat.py in concat(objs, axis, join, ignore_index, keys, levels, names, verify_integrity, sort, copy)
    293         verify_integrity=verify_integrity,
    294         copy=copy,
--> 295         sort=sort,
    296     )
    297

~/python3.7/lib/python3.7/site-packages/pandas/core/reshape/concat.py in __init__(self, objs, axis, join, keys, levels, names, ignore_index, verify_integrity, copy, sort)
    368                     "only Series and DataFrame objs are valid"
    369                 )
--> 370                 raise TypeError(msg)
    371
    372             # consolidate

TypeError: cannot concatenate object of type '<class 'pandas.core.arrays.categorical.Categorical'>'; only Series and DataFrame objs are valid
Tip
Pandas comes packaged with the Anaconda distribution we installed in System setup. However, if for some reason you don’t currently have Pandas installed, you can install it with pip or conda, check out the official Pandas documentation.
This error occurs because the categoricals are represented as integers in memory, and in the variable a, the integer 0 corresponds to the word “character” while in b, the integer 0 corresponds to the word “but”. Thus, when we ask Python to concatenate these two Pandas categorical options it doesn’t know what to do with these integer mappings to different categories, and so it throws an error. We can get around this several ways, one way is to convert the Pandas categoricals to a str type, then do the concatenation, and finally convert the concatenated Pandas obeject back to a categorical again. We demonstrate that approach below:
concatenated = pd.concat([pd.Series(a.astype("str")), pd.Series(b.astype("str"))])
pd.Categorical(concatenated)
['character', 'hits', 'your', 'eyeballs', 'but', 'integer', 'where it', 'counts']
Categories (8, object): ['but', 'character', 'counts', 'eyeballs', 'hits', 'integer', 'where it', 'your']
That seems to work 🎉 , but it’s quite a bit of typing every time we want to do this… So let’s turn this code into a function called catbind!
def catbind(a, b):
  concatenated = pd.concat([pd.Series(a.astype("str")),
                            pd.Series(b.astype("str"))])
  return pd.Categorical(concatenated)

catbind(a, b)
['character', 'hits', 'your', 'eyeballs', 'but', 'integer', 'where it', 'counts']
Categories (8, object): ['but', 'character', 'counts', 'eyeballs', 'hits', 'integer', 'where it', 'your']
Note
This book assumes you know how to write, document and test functions in Python. To learn more about this see Think Python, Chapter 3: Functions by Allen Downey.
So where do we save this function if we want it to be a part of our pypkgs Python package? Let’s review the landscape of our Python project so far:
pypkgs
├── CONDUCT.rst
├── CONTRIBUTING.rst
├── CONTRIBUTORS.rst
├── docs
│   └── conduct.rst
│   └── conf.py
│   └── contributing.rst
│   └── contributors.rst
│   └── index.rst
│   └── installation.rst
│   └── make.bat
│   └── Makefile
│   └── usage.rst
├── pypkgs
│   └── __init__.py
│   └── pypkgs.py
├── .gitignore
├── LICENSE
├── pyproject.toml
├── .readthedocs.yml
├── README.md
└── tests
    ├── __init__.py
    └── test_pypkgs.py
All the code that we would like the user to run as part of our package should live inside the pypkgs directory. Typically, for a relatively small package with just a few functions, we would house them inside a single python module (i.e., a .py file). Our template project directory structure already created and named such a module for us: pypkgs/pypkgs.py. Let’s save our function there. Additionally, given that our package depends on the Pandas Python package, we should import Pandas at the top of the pypkgs.py file. Here’s what pypkgs.py should look like:
import pandas as pd


def catbind(a, b):
    concatenated = pd.concat([pd.Series(a.astype("str")),
                              pd.Series(b.astype("str"))])
    return pd.Categorical(concatenated)
3.4. Test drive your package code
To test drive the function we just wrote we first install our package locally using Python poetry. We choose to do this with Python Poetry as opposed to using Python’s native package manager pip because Poetry automatically creates and activates a virtual environment for us and will perform tricky tasks like package solving that can sometimes trip us up when we use pip alone. We can install our package locally by ensuring we are in our root package directory and running:
poetry install
Creating virtualenv pypkgs-7_Ony_oT-py3.7 in /Users/tbeuzen/Library/Caches/pypoetry/virtualenvs
Installing dependencies from lock file

No dependencies to install or update

  - Installing pypkgs (0.1.0)
Now, inside the root project directory we can open an interactive Python session (by typing python at the command line) and import our pypkgs module which contains our catbind function as shown:
from pypkgs import pypkgs
The pypkgs module has now been mapped to the current session’s namespace and we can access the catbind function in our Python session using dot notation: pypkgs.catbind (note that if you wanted to import just the catbind function, rather than the whole pypkgs module, you could do from pypkgs.pypkgs import catbind, in which case “dot notation” would not be required to use the function). Let’s try to use the function to concatenate two Pandas categoricals:
import pandas as pd
a = pd.Categorical(["character", "hits", "your", "eyeballs"])
b = pd.Categorical(["but", "integer", "where it", "counts"])
pypkgs.catbind(a, b)

[character, hits, your, eyeballs, but, integer, where it, counts]
Categories (8, object): [but, character, counts, eyeballs, hits, integer, where it, your]
Hurray again! This seems to work as expected! Now that we have something working, you can exit your Python session (by typing exit()) and commit changes to version control:
git add .
git commit -m "First working version of catbind function"
3.5. Add package dependencies
Our function depends on the Pandas package, and without it, it would fail to work. Thus we need to record this dependency in a useful place so that when we publish our packaged code this important information (and the mechanism for making it work) will be shipped along with it. We again use poetry to do this, using the add command. This command will update the [tool.poetry.dependencies] section of the pyproject.toml file which currently looks like this and lists only Python as a project dependency:
[tool.poetry]
name = "pypkgs"
version = "0.1.0"
description = "Python package that eases the pain of concatenating Pandas categoricals!"
authors = ["Tomas Beuzen <tomas.beuzen@gmail.com>"]
license = "MIT"

[tool.poetry.dependencies]
python = "^3.7"

[tool.poetry.dev-dependencies]

[build-system]
requires = ["poetry>=0.12"]
build-backend = "poetry.masonry.api"
Let’s add our Pandas dependency now:
poetry add pandas

Using version ^1.0.5 for pandas

Updating dependencies
Resolving dependencies... (0.2s)

Writing lock file


Package operations: 5 installs, 0 updates, 0 removals

  - Installing six (1.15.0)
  - Installing numpy (1.19.0)
  - Installing python-dateutil (2.8.1)
  - Installing pytz (2020.1)
  - Installing pandas (1.0.5)
Now if we view our pyproject.toml file we see that pandas is listed as a dependency:
[tool.poetry]
name = "pypkgs"
version = "0.1.0"
description = "Python package that eases the pain of concatenating Pandas categoricals!"
authors = ["Tomas Beuzen <tomas.beuzen@gmail.com>"]
license = "MIT"

[tool.poetry.dependencies]
python = "^3.7"
pandas = "^1.0.5"

[tool.poetry.dev-dependencies]

[build-system]
requires = ["poetry>=0.12"]
build-backend = "poetry.masonry.api"
This changed two files, pyproject.toml (which we printed above) and poetry.lock (a record of all the packages and exact versions of them that poetry downloaded for this project). These changes are important for our package, so let’s commit them to version control as well:
git add .
git commit -m "added pandas as a dependency"
Note
For those of you who have used requirements.txt before with pip or a environment.yml with conda, you can think of poetry.lock as the poetry equivalent of those files.
3.6. Package documentation
3.6.1. Reading and rendering documentation locally
For the users of your code (including your future self) we need to have readable and accessible documentation expressing how to install your package, and how to use the functions within it. We’ll discuss documentation in detail in the chapter Documentation, but for now, we will demonstrate the basic steps required to get your documentation up-and-running quickly.
The Python packaging ecosystem has a tool to help you easily make documentation - Sphinx. In the Cookiecutter template we used to define our package’s directory structure, there is a basic docs template that the Cookiecutter progam filled in with the information you entered interactively when you ran cookiecutter https://github.com/UBC-MDS/cookiecutter-ubc-mds.git. These files live in the docs directory and are .rst (reStructuredText markup language) filetype. This is a lightweight markup language that works similar to Markdown but uses different syntax. The templates provided to you here are fairly well formatted already, so you do not have to change the .rst formatting, however if you are interested in doing so, you can see the Sphinx documentation to get started.
First, we need to install sphinx as a development dependency using poetry.
poetry add --dev sphinx
Note
The use of --dev specifies a development dependency, rather than a package function dependency. A development dependency is a package that is not required by a user to use your package, but is required for development purposes. If you look in pyproject.toml you will see that sphinx gets added under the [tool.poetry.dev-dependencies] section as opposed to the [tool.poetry.dependencies] section.
Next, to render the help documents locally from .rst to .html we need to navigate into the docs directory and then run the Makefile there, directing it to run the html target:
cd docs
poetry run make html
Note
We append poetry run in front of most of our commands in this Python package workflow to ensure our commands are executed within our project’s virtualenv and are using only the software tools we have specifically installed in that virtual environment.
Warning
You may see some red warnings while your docs are rendering, but these can be ignored and are typically just suggestions on how to improve your docs if you wish.
If we now look inside our docs directory we see that it has expanded, and the rendered .html files live in _build/html. We can open _build/html/index.html to view our docs locally on our laptop, they should look something like this:
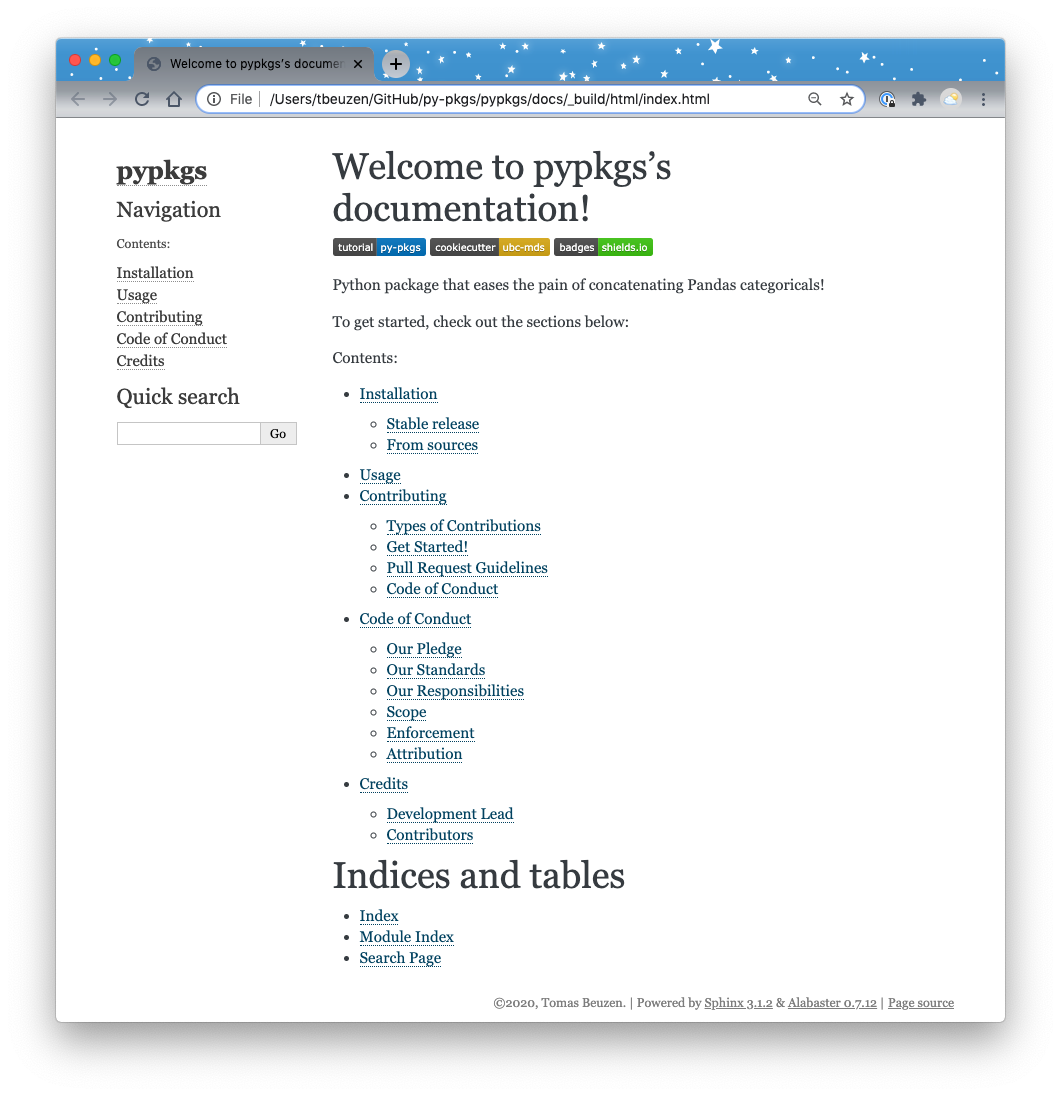
Fig. 3.3 The rendered docs homepage.
If we click on the “Module Index” link under the heading “Indices and tables” at the bottom of the page we get a “Your file was not found message”:
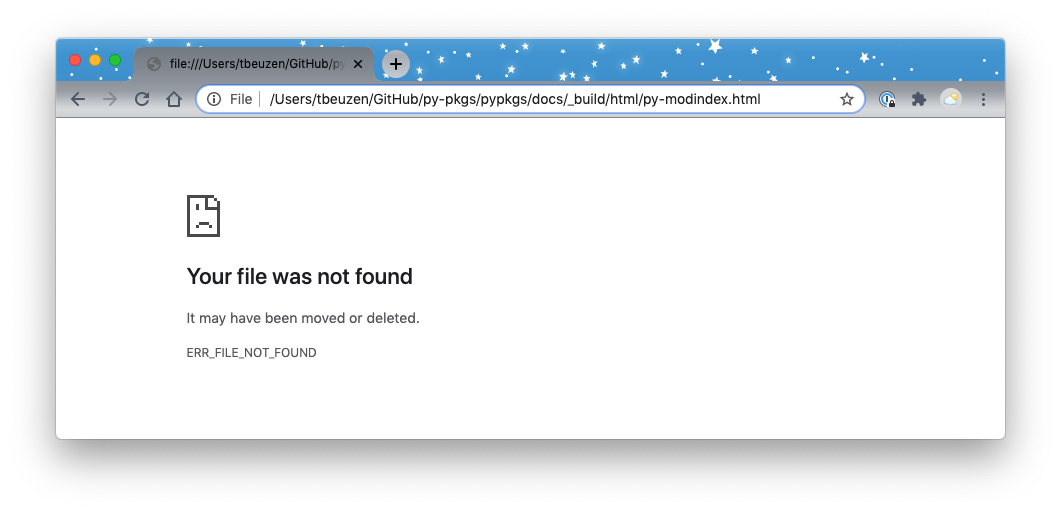
Fig. 3.4 File not found error!
This is because we haven’t written any documentation for our package function. Let’s do that now by adding a NumPy-style docstring to the catbind function in pypkgs/pypkgs.py as shown below (we’ll discuss docstring style more in the chapter Documentation):
import pandas as pd


def catbind(a, b):
    """
    Concatenates two pandas categoricals.

    Parameters
    ----------
    a : pandas.core.arrays.categorical.Categorical
      A pandas categorical.
    b : pandas.core.arrays.categorical.Categorical
      A pandas categorical that you wish to concatenate to a.

    Returns
    -------
    pandas.core.arrays.categorical.Categorical
      The new concatenated pandas categorical.

    Examples
    --------
    >>> from pypkgs import pypkgs
    >>> a = pd.Categorical(["character", "hits", "your", "eyeballs"])
    >>> b = pd.Categorical(["but", "integer", "where it", "counts"])
    >>> pypkgs.catbind(a, b)
    [character, hits, your, eyeballs, but, integer, where it, counts]
    Categories (8, object): [but, character, counts,
    eyeballs, hits, integer, where it, your]
    """
    concatenated = pd.concat([pd.Series(a.astype("str")),
                              pd.Series(b.astype("str"))])
    return pd.Categorical(concatenated)
Now we can use a sphinx extension (napolean) to render our NumPy-styled docstring into a modules page on our docs. To do this we need to install napoleon as a dev dependency:
poetry add --dev sphinxcontrib-napoleon
Note
Normally to use this extension, we would also have to add extensions = ['sphinx.ext.napoleon'] in the conf.py file in the docs directory, but we have taken care of this for you already with our Cookiecutter template.
Now we can change back to our root pypkgs directory, and use sphinx-apidoc and poetry to re-render our docs:
cd ..
poetry run sphinx-apidoc -f -o docs/source pypkgs
cd docs
poetry run make html
Now when we click on the “Module Index” link under the heading “Indices and tables” we see a webpage that has a link to our module, pypkgs.pypkgs:
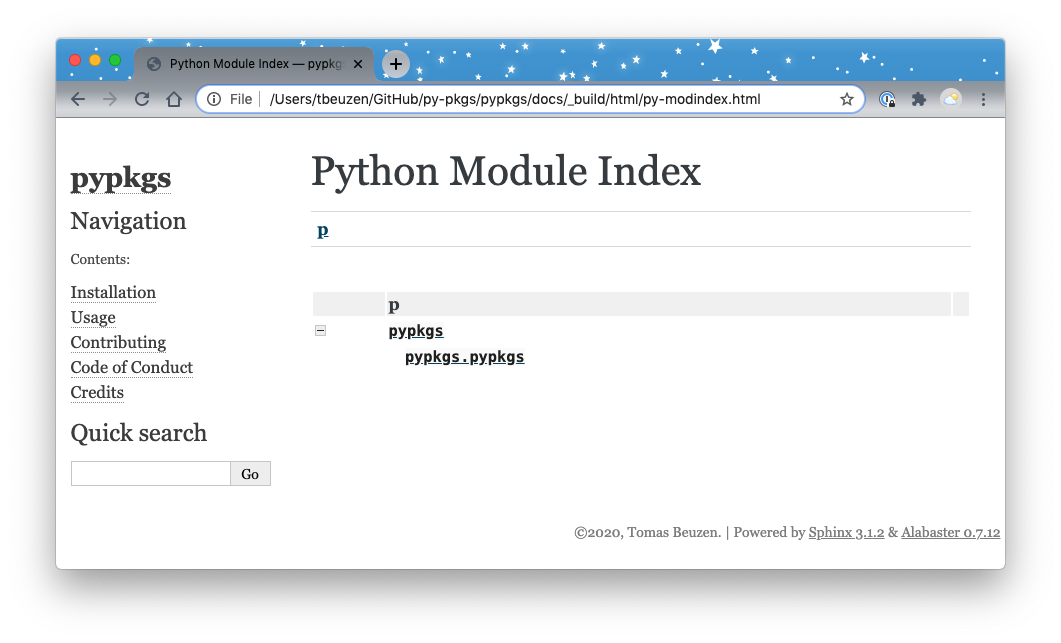
Fig. 3.5 The rendered docs module index.
And we can click on that to see the docs for pypkgs.pypkgs.catbind. Which should look roughly like this:
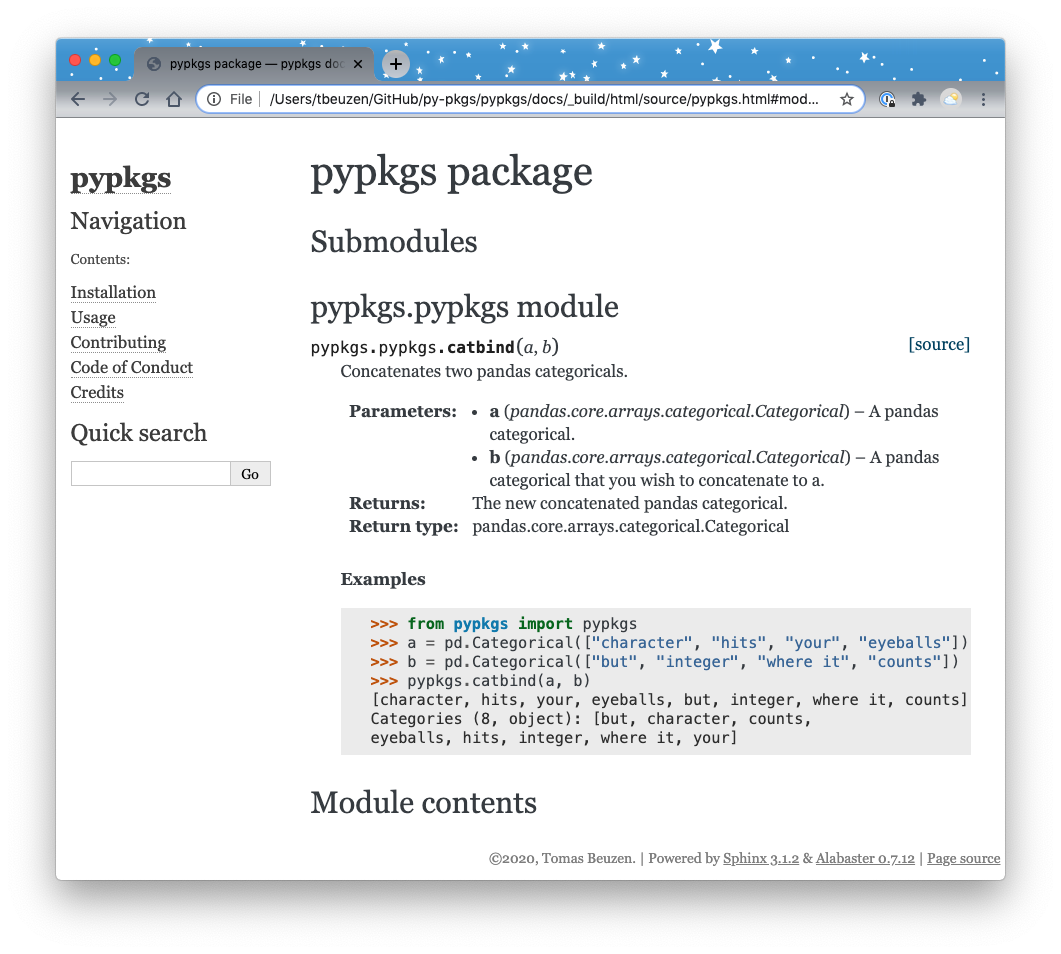
Fig. 3.6 Our function documentation.
Another hurray! 🎉🎉🎉 Let’s commit this to version control and push to our remote:
cd ..
git add .
git commit -m "generated and rendered docs for local viewing"
git push
3.6.2. Reading and rendering documentation remotely
To share these docs online, we need to link our GitHub repository to Read the Docs (where we will build and host our docs remotely). To do this:
Visit https://readthedocs.org/ and click on “Sign up”;
Select “Sign up with GitHub”;
Click “Import a Project”;
Click “Import Manually”;
Fill in the project details by providing a package name (this must be a unique name, we’ve already taken “pypkgs” so perhaps try “pypkgs[your initials]”), the repository URL, and leave the rest as is. Click “Next”; and,
Click “Build version”.
After following the steps above, your docs should get successfully built on Read the Docs and you should be able to access them via the “View Docs” button on the build page, or from the link that Cookiecutter created for you on your repositories README.md file.
Note
For Read the Docs to work with the poetry package workflow you need to have a .readthedocs.yml in the root of your Python package. We have created this for you using Cookiecutter and you can view it here.
3.7. Testing
We have interactively taken catbind for a test drive, but to prove to our future self and others that our code does in fact do what it is supposed to do, let’s write some formal unit tests. We’ll discuss testing in detail in the Testing chapter, but will go over the key steps here. In Python packages, our tests live inside the test directory, typically in a file called test_<module_name>.py, thus for this package this is tests/test_pypkgs.py. Let’s add a unit test (as a function named test_catbind) for our catbind function there now:
from pypkgs import __version__
from pypkgs import pypkgs
import pandas as pd


def test_version():
    assert __version__ == '0.1.0'

def test_catbind():
    a = pd.Categorical(["character", "hits", "your", "eyeballs"])
    b = pd.Categorical(["but", "integer", "where it", "counts"])
    assert ((pypkgs.catbind(a, b)).codes == [1, 4, 7, 3, 0, 5, 6, 2]).all()
    assert ((pypkgs.catbind(a, b)).categories == ["but", "character",
            "counts", "eyeballs", "hits", "integer", "where it", "your"]).all()
Note
Given that we use pd.Categorical to create objects to test on, we have to import the pandas package at the top of our test file.
While we could test our test functions by starting a Python session, importing and running them it is much more efficient to automate the testing workflow. In the Python package ecosystem one way we can do this is to use pytest. A single call to pytest from the root of a project will look for all files in the tests directory, import all files prefixed with test* and then call all functions prefixed with test*. Pretty great!
To try this out, we first add pytest as a dev dependency via poetry:
poetry add --dev pytest
Then to run the tests, we use:
poetry run pytest

============================= test session starts ==============================
platform darwin -- Python 3.7.6, pytest-5.4.3, py-1.9.0, pluggy-0.13.1
rootdir: /Users/tbeuzen/GitHub/py-pkgs/pypkgs
collected 2 items

tests/test_pypkgs.py ..                                                  [100%]

============================== 2 passed in 0.56s ===============================
We get no error returned to us, indicating that our tests passed, Hurray! This suggests that the code we wrote is correct (at least to our test specifications)! Now we can share this with the world by putting these under local and remote version control:
git add .
git commit -m "added unit tests for catbind"
git push
3.8. Building and publishing your package
3.8.1. TestPyPI
Python packages are generally shared via the PyPI package index. However, when we are just starting to develop packages, and/or at the development stage of our package, we typically first check that everything works by submitting to testPyPi. poetry has a command called publish which we can use to do this, however the default behaviour is to publish to PyPI. So we need to add testPyPI to the list of repositories poetry knows about via:
poetry config repositories.test-pypi https://test.pypi.org/legacy/
Before we send our package, we first need to build it to source and wheel distributions (the format that PyPI distributes and something you’ll learn more about in the next chapter Package structure and state) using poetry build:
poetry build

Building pypkgs (0.1.0)
 - Building sdist
 - Built pypkgs-0.1.0.tar.gz

 - Building wheel
 - Built pypkgs-0.1.0-py3-none-any.whl
Finally, to publish to testPyPI we can use poetry publish (you will be prompted for your testPyPI username and password, sign up for one if you have not already done so):
poetry publish -r test-pypi
Now you should be able to visit your package on testPyPI (e.g., https://test.pypi.org/project/pypkgs/) and download it from there using pip via:
pip install --index-url https://test.pypi.org/simple/ --extra-index-url https://pypi.org/simple pypkgs
Note
By default pip install will search PyPI for the named package. However, we want to search testPyPI because that is where we uploaded our package. The argument --index-url points pip to the testPyPI index. However, our package pypkgs depends on pandas which can’t be found on testPyPI (it is hosted on PyPI). So, we need to use the --extra-index-url argument to also point pip to PyPI so that it can pull any necessary dependencies of pypkgs from there.
3.8.2. PyPI
When you’re at the point where you’re happy to officially share your package with the world, you can publish to PyPI by simply typing:
poetry publish
Your package will then be available on PyPI (e.g., https://pypi.org/project/pypkgs/) and can be installed with pip:
pip install pypkgs
Tip
There are a number of optional arguments you can specify in your pyproject.toml file to control the metadata of your package, check them out in the poetry documentation. For example, you can use your README.md file as the description of your package on testPyPI or PyPI. To do this, you need to add the readme argument to the [tool.poetry] section of your pyproject.toml file and point to your README.md file, for example:
[tool.poetry]
name = "pypkgs"
version = "0.1.0"
description = "Python package that eases the pain of concatenating Pandas categoricals!"
authors = ["Tomas Beuzen <tomas.beuzen@gmail.com>"]
license = "MIT"
readme = "README.md"